Clusters UltraMonkey en Linux
Existen varios proyectos dedicados a facilitar la instalación de clusters HA (High Availability, alta disponibilidad), utilizados principalmente en granjas de servidores. Uno de ellos es UltraMonkey (ultramonkey.org), un proyecto que simplifica la instalación y configuración de un cluster HA integrando las herramientas LVS, HeartBeat y Ldirectord.
Recursos
- UltraMonkey HOWTO: ultramonkey.org/3/
- The UltraMonkey solution: linuxvirtualserver.org/docs/ha/ultramonkey.html
Veamos un ejemplo de un cluster HA utilizando UltraMonkey:
- instalar el kernel LVS: uno de los componentes de LVS es el parche ip_vs (IP Virtual Server), incluido en los kernel 2.6, por lo que ya no es necesario parchear el kernel manualmente.
- instalar UltraMonkey: cuando instalemos UltraMonkey
(paquete ultramonkey) se instalarán por dependencias ipvsadm
(las herramientas de usuario de LVS, paquete ipvsadm), HeartBeat
(paquete heartbeat) y Ldirectord (paquete ldirectord).
Para ello editaremos /etc/apt/sources.list e incluiremos el repositorio de UltraMonkey:
deb http://www.ultramonkey.org/download/3/ sarge main
deb-src http://www.ultramonkey.org/download/3 sarge main
Actualizaremos la lista de paquetes e instalaremos:
# apt-get update
# apt-get install ultramonkey
Si nos pregunta:
Do you want to automatically load IPVS rules on boot? No
Select a daemon method: none - configurar el router: el router debe redirigir las peticiones <IP_pública>:80 a <IP_virtual>:80
- configurar LVS
- Para que los directores reenvíen las peticiones a los servidores reales
activaremos el bit de forwarding. Para ello editaremos el archivo
/etc/sysctl.conf y descomentaremos la línea:
# Uncomment the next line to enable packet forwarding for IPv4
net.ipv4.conf.default.forwarding=1
Y ejecutaremos:
# sysctl -pEsto es equivalente a:
# echo 1 > /proc/sys/net/ipv4/ip_forward - El script de inicio de LVS es /etc/init.d/ipvsadm y el archivo de configuración /etc/ipvsadm.rules.
- Para que los directores reenvíen las peticiones a los servidores reales
activaremos el bit de forwarding. Para ello editaremos el archivo
/etc/sysctl.conf y descomentaremos la línea:
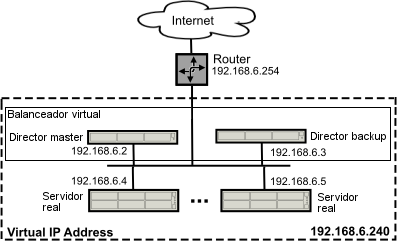
- configurar HeartBeat: instalaremos HeartBeat en ambos directores. Uno de
los directores está activo (master) y el otro está en hot stand-by (backup)
y HeartBeat controla todo el asunto: los monitoriza y activa el director backup si el master
falla. También se encarga de que el director master responda en la IP virtual (VIP)
192.168.6.240 y de lanzar/detener Ldirectord en ambos directores para monitorizar
los servidores reales.
- /etc/heartbeat/ha.cf: crearemos este archivo idéntico en ambos directores:
logfacility     local0
bcast   eth0
mcast eth0 225.0.0.1 694 1 0
auto_failback off
respawn hacluster /usr/lib/heartbeat/ipfail
apiauth ipfail gid=haclient uid=hacluster
node   loadb1
node   loadb2
- /etc/heartbeat/haresources: crearemos este archivo idéntico en ambos directores:
loadb1 IPaddr2::192.168.6.240/24/eth0/192.168.0.255
  ldirectord::ldirectord.cf  LVSSyncDaemonSwap::master
En este archivo se especifica el nombre del director master (loadb1), la IP virtual (192.168.6.240) y los demonios a monitorizar (ldirectord y LVSSyncDaemonSwap).
- /etc/heartbeat/authkeys: crearemos este archivo idéntico en ambos directores:
auth 3
3 md5 mi_password
Aquí definimos el mecanismo de autentificación (md5) y el password para que los dos demonios heartbeat de los servidores se autentifiquen uno contra el otro (mi_password). Sólo root debe tener permisos de lectura sobre /etc/heartbeat/authkeys por lo que haremos:
# chmod 600 /etc/heartbeat/authkeys
- /etc/heartbeat/ha.cf: crearemos este archivo idéntico en ambos directores:
- configurar Ldirectord: monitoriza los servidores reales. Si un servidor real
falla Ldirectord lo excluye del grupo. Cuando vuelva a estar en línea será reinsertado.
Si todos los servidores reales fallan insertará un servidor de fallos, que suele ser
el propio director, hasta que algún servidor real vuelva a estar en línea.
- /etc/ha.d/ldirectord.cf: crearemos este archivo idéntico en ambos directores:
checktimeout=10
checkinterval=2
autoreload=no
logfile="local0"
quiescent=yes

virtual=192.168.6.240:80
        real=192.168.6.5:80 gate
        real=192.168.6.4:80 gate
        fallback=127.0.0.1:80 gate
        service=http
        request="ldirector.html"
        receive="Test Page"
        scheduler=rr
        protocol=tcp
        checktype=negotiate
- borrar el script de inicio de Ldirectord: Ldirectord estará bajo el
control de HeartBeat (que se encargará de lanzarlo) por lo que borraremos el script de
inicio de Ldirectord en ambos directores:
# update-rc.d -f ldirectord remove
# /etc/init.d/ldirectord stop
- /etc/ha.d/ldirectord.cf: crearemos este archivo idéntico en ambos directores:
- configurar los servidores reales:
- aceptar peticiones en la IP virtual: configuraremos los dos nodos Apache
(webserver1 y webserver2) para que acepten peticiones en la IP virtual
192.168.6.240. Para ello editaremos el archivo /etc/sysctl.conf:
# Enable configuration of arp_ignore option
net.ipv4.conf.all.arp_ignore = 1

# When an arp request is received on eth0, only respond if that
# address is configured on eth0. In particular, do not respond if
# the address is configured on lo
net.ipv4.conf.eth0.arp_ignore = 1

# Ditto for eth1, add for all ARPing interfaces
#net.ipv4.conf.eth1.arp_ignore = 1


# Enable configuration of arp_announce option
net.ipv4.conf.all.arp_announce = 2

# When making an ARP request sent through eth0 Always use an address
# that is configured on eth0 as the source address of the ARP request.
# If this is not set, and packets are being sent out eth0 for an address
# that is on lo, and an arp request is required, then the address on lo
# will be used. As the source IP address of arp requests is entered into
# the ARP cache on the destination, it has the effect of announcing this
# address. This is not desirable in this case as adresses on lo on the
# real-servers should be announced only by the linux-director.
net.ipv4.conf.eth0.arp_announce = 2

# Ditto for eth1, add for all ARPing interfaces
#net.ipv4.conf.eth1.arp_announce = 2
Y ejecutaremos en ambos nodos Apache:
# sysctl -pEditaremos también /etc/network/interfaces y añadiremos las líneas:
auto lo:0
iface lo:0 inet static
  address 192.168.6.240
  netmask 255.255.255.255
  pre-up sysctl -p > /dev/null
Y ejecutaremos:
# ifup lo:0 - /var/www/ldirector.html: crearemos en ambos nodos Apache el archivo
/var/www/ldirector.html al que Ldirectord accede repetidamente para comprobar
si los nodos Apache siguen funcionando, cuyo contenido es:
Test Page
- gateway de los servidores reales: el gateway de los servidores reales no es el director sino el router (no es una configuración NAT sino direct routing o tunnelling). Esto evita que el director se convierta en un cuello de botella conseguiendo mejor rendimiento.
- aceptar peticiones en la IP virtual: configuraremos los dos nodos Apache
(webserver1 y webserver2) para que acepten peticiones en la IP virtual
192.168.6.240. Para ello editaremos el archivo /etc/sysctl.conf:
- Arrancar y comprobar
- arrancar HeartBeat: en ambos directores:
# /etc/init.d/heartbeat start - comprobar la IP virtual: en el director master veremos la IP
virtual 192.168.6.240:
# ip addr sh eth0
2: eth0: <BROADCAST,MULTICAST,UP>mtu 1500 qdisc pfifo_fast qlen 1000
   link/ether 00:16:3e:40:18:e5 brd ff:ff:ff:ff:ff:ff
   inet 192.168.6.2/24 brd 192.168.0.255 scope global eth0
   inet 192.168.6.240/24 brd 192.168.0.255 scope global secondary eth0
En el director backup no veremos la IP virtual:
# ip addr sh eth0
2: eth0: <BROADCAST,MULTICAST,UP>mtu 1500 qdisc pfifo_fast qlen 1000
   link/ether 00:16:3e:50:e3:3a brd ff:ff:ff:ff:ff:ff
   inet 192.168.6.3/24 brd 192.168.0.255 scope global eth0
- comprobar Ldirectord: para comprobar que Ldirectord funciona correctamente
en el director master:
# ldirectord ldirectord.cf status
ldirectord for /etc/ha.d/ldirectord.cf is running with pid: 1455
En el director backup:
# ldirectord ldirectord.cf status ldirectord is stopped for /etc/ha.d/ldirectord.cf - comprobar LVS: para comprobar el estado de LVS en el director master:
# ipvsadm -L -n
IP Virtual Server version 1.2.1 (size=4096)
Prot LocalAddress:Port Scheduler Flags
  ->RemoteAddress:Port           Forward Weight ActiveConn InActConn
TCP  192.168.6.240:80 rr
  ->192.168.6.5:80             Route   0      0          0
  ->192.168.6.4:80             Route   0      0          0
  ->127.0.0.1:80               Local   1      0          0
En el director backup:
# ipvsadm -L -n
IP Virtual Server version 1.2.1 (size=4096)
Prot LocalAddress:Port Scheduler Flags
  ->RemoteAddress:Port           Forward Weight ActiveConn InActConn
- comprobar la sincronización LVS: los directores están
sincronizados: si falla el master el backup dispone de la información de las conexiones,
de manera que puedan mantenerse activas las conexiones establecidas. De esto se encarga el
demonio de sincronización. Para comprobarlo en el director master:
# /etc/ha.d/resource.d/LVSSyncDaemonSwap master status
master running
(ipvs_syncmaster pid: 1591)
En el director backup:
# /etc/ha.d/resource.d/LVSSyncDaemonSwap master status master stopped - simular el fallo de Apache: ahora podemos acceder al sitio web alojado
en dos nodos Apache en la dirección http://192.168.6.240. Probaremos a detener
Apache alternativamente en webserver1 y webserver2 y comprobaremos que
seguimos accediendo a la web y que las peticiones se dirigen al nodo que funciona.
# /etc/init.d/apache stop - simular el fallo del director master: simularemos el fallo de loadb1:
# /etc/init.d/heartbeat stopEsperaremos unos segundos y entraremos en http://192.168.6.240. Si podemos acceder a la web significa que loadb2 es ahora el nuevo director master.
- simular que el director master vuelve a estar en línea: reiniciamos HeartBeat
en loadb1:
# /etc/init.d/heartbeat startEsperaremos unos segundos y comprobaremos que loadb1 vuelve a ser el master.
- logs: HeartBeat y Ldirectord envían logs a /var/log/messages
- arrancar HeartBeat: en ambos directores:
- instalar MON (paquete mon): programa que monitoriza el sistema.
- instalar un cliente NTP (paquete ntpdate): para asegurarnos de que
todos los nodos tienen la misma hora del sistema (System Time) los conectaremos al mismo
servidor NTP (que puede ser local). Su sintaxis es:
# ntpdate <server>Para comprobar la hora del sistema:
# date
Article printed from Estréllate y Arde: https://www.estrellateyarde.org
URL to article: https://www.estrellateyarde.org/discover/cluster-ultramonkey-en-linux
Click here to print.